Imagine sitting in your living room, the lights dimmed, and your favorite song playing in the background. The soulful notes, the deep bass, and the crisp highs all come together to create a perfect symphony of sound.
But have you ever wondered what makes this possible? The unsung hero behind this auditory magic is the humble speaker wire.
Often overlooked, this essential component ensures that the melodies from your amplifier reach your speakers in perfect harmony. However, like any great performance, the speaker wire needs a bit of preparation to shine.
Stripping it might seem like a straightforward task, but a misstep can dampen the entire experience. Fear not, for in this guide, I’ll be your conductor, leading you through the nuances of stripping speaker wire.
Let’s work together to guarantee that each musical tone resonates perfectly, transforming your sound system into a harmonious masterpiece. So, let’s jump in and strike the correct musical chords!
What You Will Need
To strip speaker wire, you will need the following tools:
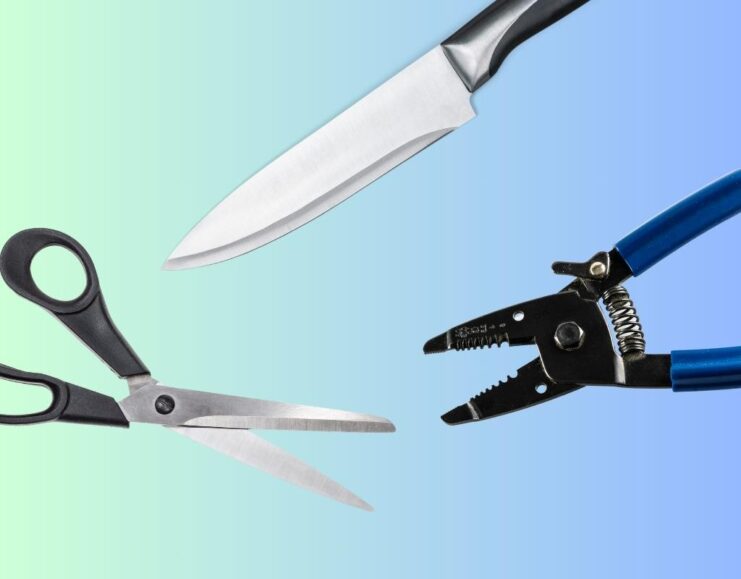
- A wire stripper
- A pair of scissors
- A sharp knife
Steps How To Do It
Every audiophile knows that the secret to a perfect sound system isn’t just about the high-end speakers or the state-of-the-art amplifier; it’s also about the tiny details, like how you strip and connect your speaker wires. Properly stripped wires are the unsung heroes, ensuring that the melodies and beats reach your ears in their purest form. Let’s embark on this journey to master the art of stripping speaker wire.
Step 1: Choose the Right Wire Stripper
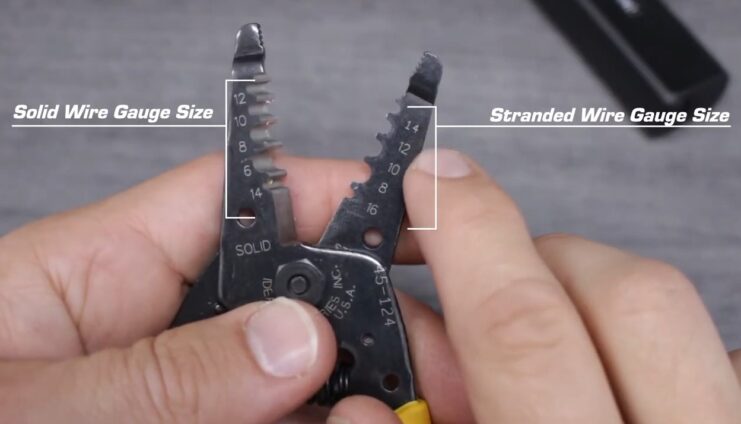
- Variety Matters: From manual to automatic, the market is flooded with wire strippers. Each is tailored for different wire gauges and types.
- Size Check: It’s crucial to match the blade width of the stripper with the insulation width of your speaker wire. This precision ensures the internal wires remain unscathed during the stripping process.
- Recommendation: For those new to the world of audio setups, an adjustable wire stripper is a godsend. Its versatility allows you to handle a range of wire sizes without needing multiple tools.
Step 2: Cut the Wire to Length
- Measure Twice, Cut Once: Precision is key. Always measure the distance between your amplifier and speakers, and then add a buffer—around 10% extra—to account for any adjustments or errors.
- Sharp Tools: A clean cut is essential. Dull tools can fray the wire ends, making the subsequent steps more challenging. Always ensure your wire cutter is sharp and well-maintained.
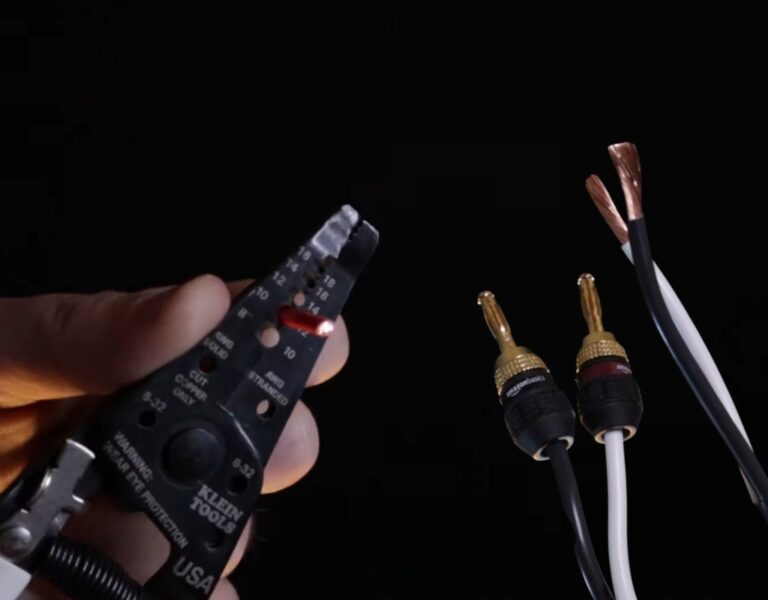
Step 3: Strip the Insulation
- Positioning: Align the wire with the appropriate gauge slot on the wire stripper. Ensure it’s snug but not forced.
- Gentle Pressure: A delicate touch is crucial. Press down just enough for the blade to penetrate the insulation without touching the internal wires.
Step 4: Remove the Insulation
- Gentle Pull: With a firm grip on the wire, gently pull the insulation away. If done correctly, it should come off smoothly, revealing the shiny metal beneath.
- Visual Inspection: Always inspect the stripped end. Any nicks or cuts on the internal wires mean you need to trim and strip again.
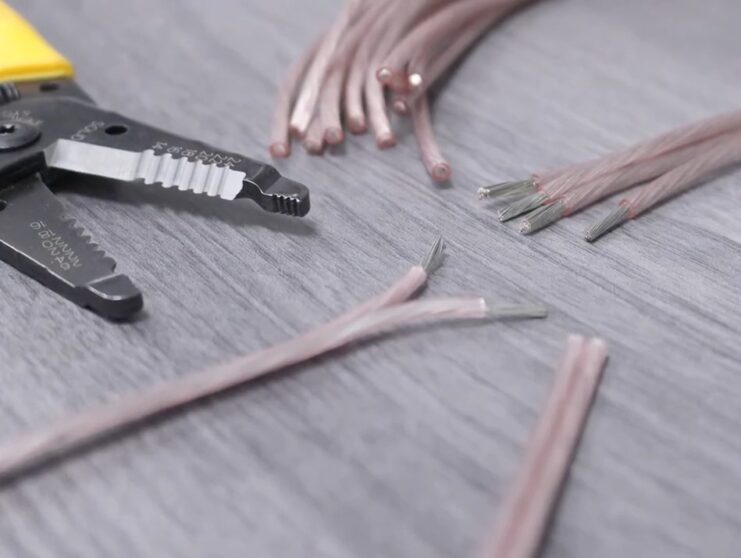
Step 5: Twist the Wires
- For Stranded Wires: Stranded wires offer flexibility but can be tricky to handle. Once stripped, twist them uniformly to ensure they stay together.
- Uniformity: A tight, consistent twist not only looks professional but also ensures a stable connection.
Step 6: Connect the Wires
- Polarity Matters: It’s more than just positive and negative. Incorrectly connecting the wires can lead to phase issues, affecting sound quality. Always match the wire markings or colors to the appropriate terminals.
- Secure Connection: After connecting, a gentle pull-back tests the connection’s strength. If it’s firm, you’re good to go!
Tips for Stripping Speaker Wire
When it comes to stripping speaker wire, remember that it’s not just about the technique alone; there are also other factors to consider.
- Precision with Sharpness: Always use a sharp wire stripper. A dull tool can lead to uneven cuts, and frayed wires, and can compromise the quality of the connection. A sharp tool ensures a clean, precise cut every time.
- Gentle Handling: While it’s essential to have a firm grip, be gentle when stripping the insulation. The internal metal wires are delicate and can be easily damaged or nicked. Any damage can lead to reduced sound quality or even system failures.
- Mastering Stranded Wires: Stranded wires, made up of multiple thin wires, offer flexibility but can be tricky to handle. Once stripped, always twist them uniformly. This not only ensures a solid, unified end but also prevents individual strands from breaking or causing a short circuit.
- Polarity is Key: Connecting wires to the wrong terminals can lead to phase issues, affecting the overall sound quality. Always ensure the positive wire (often marked or colored) connects to the positive terminal and the negative to the negative. This simple step can make a world of difference in sound output.
Additional Information

Here are some additional details you should take into consideration.
Different Strokes for Different Folks
While the method detailed in this guide is widely practiced, there are alternative ways to strip speaker wire. Some prefer using specialized tools, while others opt for manual methods.
It’s all about finding what works best for you.
Professional Touch
If you’re hesitant or unsure about stripping speaker wire, there’s no harm in seeking professional help. Many audio shops or electricians offer this service, ensuring a perfect job without any risks.
Size Matters
One size doesn’t fit all, especially with wire strippers. Always ensure you’re using the correct size for the wire gauge you’re working with.
A mismatch can lead to damaged wires or an inefficient stripping process.
Safety First
Stripping wires might seem harmless, but accidents can happen. Always wear safety glasses to protect your eyes from any potential wire snaps or cuts.
And remember, the sharper the tool, the more careful you should be to avoid any injuries.
FAQs
What are the signs of a bad speaker wire?
The signs of a bad speaker wire include:
- No sound from the speaker
- Intermittent sound from the speaker
- Fuzzy or distorted sound from the speaker
- A burning smell coming from the speaker
Can I use a knife to strip the speaker wire?
Yes, you can use a knife to strip speaker wire, but it is not the best option. A knife can easily damage the metal wires, and it can be difficult to get a clean cut.
A wire stripper is the best tool for stripping speaker wire.
Can I use a pair of scissors to strip the speaker wire?
Yes, you can use a pair of scissors to strip speaker wire, but it is not the best option. Scissors can also easily damage the metal wires, and they are not as precise as a wire stripper.
What is the difference between a wire stripper and a crimper?
A wire stripper is used to remove the insulation from a wire, while a crimper is used to connect the wire to a connector. A wire stripper is the best tool for stripping speaker wire, while a crimper is the best tool for connecting the speaker wire to the speaker terminals.
How do I prevent the speaker wires from corroding?
To prevent the speaker wires from corroding, you can use a wire sealant. Wire sealant is a clear, liquid sealant that is applied to the exposed metal wires.
It helps to protect the wires from moisture and oxygen, which can cause corrosion.
How do I fix a loose speaker wire connection?
If you have a loose speaker wire connection, you can tighten the screw on the speaker terminal. If the screw is already tight, you can try to twist the wire a little bit to make a better connection.
If the wire is still loose, you may need to replace the speaker terminal.
Final Words
Stripping speaker wire, while seemingly straightforward, plays a pivotal role in the overall performance of your sound system. It’s not just about removing insulation; it’s about ensuring that every note, beat, and melody is transmitted with clarity and precision.
Doing it correctly is paramount to avoid any disruptions or distortions in sound quality. This blog post has aimed to demystify the process, providing a step-by-step guide to ensure optimal results.
Whether you’re a seasoned audiophile or a beginner setting up your first sound system, mastering this skill is crucial. Remember, the foundation of great sound lies in the details, and stripping your speaker wire correctly is one such vital detail.