Microphone issues on a Windows computer can be incredibly frustrating, especially when you’re in the middle of an important call or recording a podcast. The problem can arise due to a myriad of reasons, from outdated drivers to incorrect settings.
Similarly, just as microphone issues can be a nuisance during important calls, issues like a Bluetooth speaker constantly emitting beeps can disrupt your listening experience.
Fortunately, most of these issues can be easily fixed. In this guide, we’ll explore the common reasons for mic interruptions in Windows 10/11 and offer 10 straightforward solutions to resolve them.
1. Check Your Hardware
Before diving into software-based solutions, it’s essential to ensure that the problem isn’t stemming from your microphone hardware itself.
Examine the Cable Connection
A loose or damaged connection can cause intermittent audio interruptions.
- Check the Connection: Ensure your mic’s cable is securely plugged into the computer. If using a USB one, try different ports to see if the issue persists.
- Inspect for Damage: Look over the cable for signs of wear, kinks, or breaks. If the cable appears damaged, consider replacing it or using a different mic is faulty is by testing it on another device.
- Use Another Computer: Connect your mic to a different computer and check if the issue persists. If it does, the microphone might be the root cause.
- Smartphone Test: If you have an adapter, you can also test your mic on a smartphone. If it works perfectly on your phone, the problem is likely software-related on your computer.
2. Update or Roll Back Drivers
Drivers play a crucial role in ensuring the correct functioning of hardware components. An outdated or corrupted driver could be the reason behind your mic woes.
Update Your Audio Drivers
Keeping your audio drivers updated can prevent many audio-related issues.
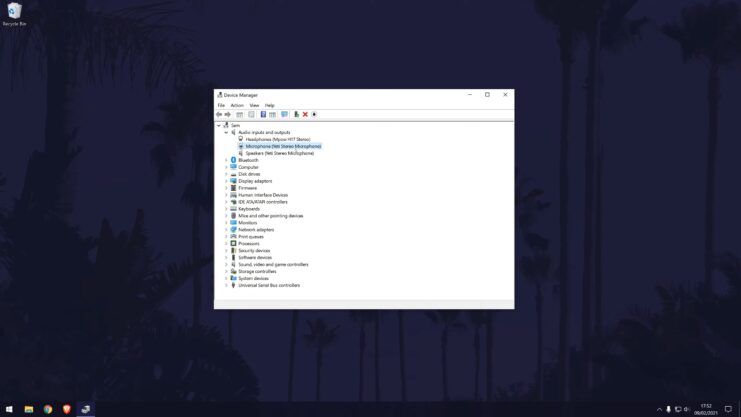
- Navigate to the Device Manager.
- Right-click on your microphone under the “Sound, video and game controllers” section.
- Select Update driver and follow the on-screen instructions.
Roll Back a Driver
If the mic issues started after a recent driver update, rolling back to a previous version might be the solution.
- Go to Device Manager as before.
- Right-click on your microphone, select Properties, then the Driver tab.
- Click Roll Back Driver if the option is available.
3. Adjust the Settings
Sometimes, the default settings in Windows can interfere with the proper functioning of your microphone.
Set as Default Device
Ensure that your operating system recognizes your microphone as the primary audio input source.
- Right-click on the speaker icon in the system tray.
- Choose Open Sound settings or Sounds.
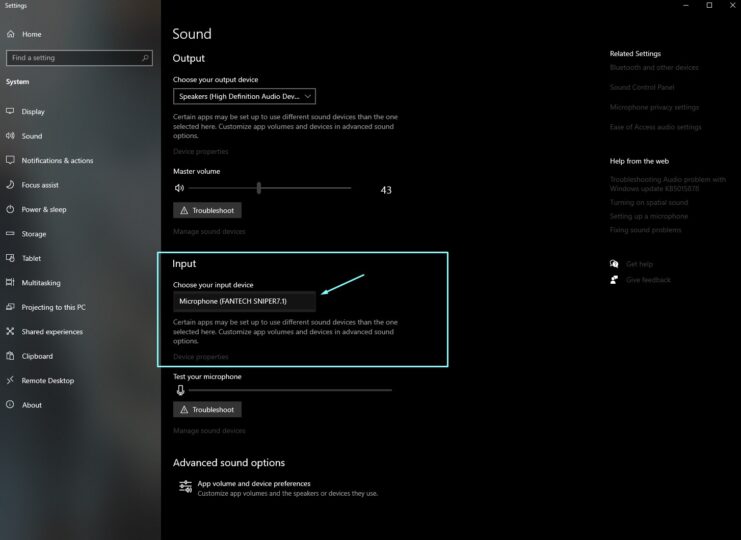
- Under the Input section, select your microphone from the dropdown menu.
Adjust the Levels
If your mic is set too low, it might seem like it’s cutting out when in reality, it’s just too quiet.
- Go to Sound settings as before.
- Click on Device Properties.
- Adjust the volume slider to an optimal level.
4. Disable Exclusive Mode
Some applications can take exclusive control of your microphone, leading to interruptions when other applications try to access it.
Access Advanced Properties
To address this:
- Navigate to Sound settings.
- Click on Device Properties, then Additional device properties.
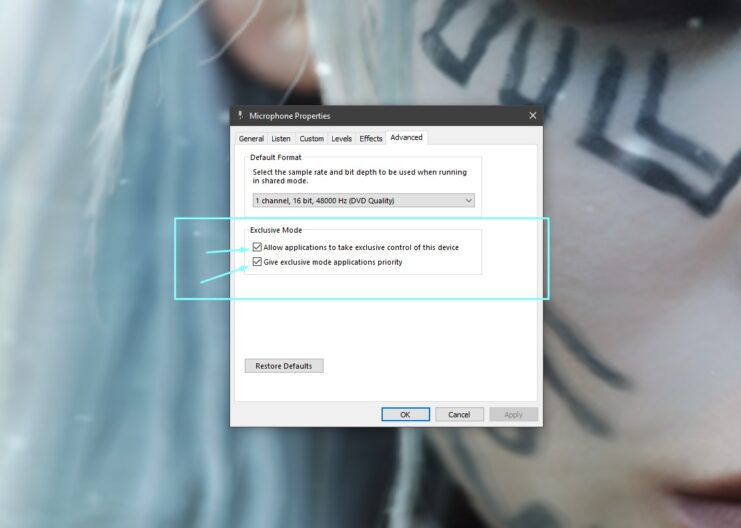
Uncheck Exclusive Mode Options
In the Advanced tab:
- Uncheck the boxes next to “Allow applications to take exclusive control of this device” and “Give exclusive mode applications priority”.
- Click Apply and then OK.
5. Inspect Interfering Applications
Occasionally, certain applications can interfere with the microphone’s functioning.
Close Potential Culprits
- Close unused applications: Some might be accessing the microphone without your knowledge.
Investigate Background Processes
- Open the Task Manager (Ctrl + Shift + Esc).
- Look under the “Processes” tab for any application that might be using the mic and end its process.
6. Check Windows Privacy Settings
Windows 10/11 has strict privacy settings, and if not correctly configured, these settings can prevent apps from accessing the mic.
Navigate to Privacy Settings
- Click on the Windows Start button, then Settings.
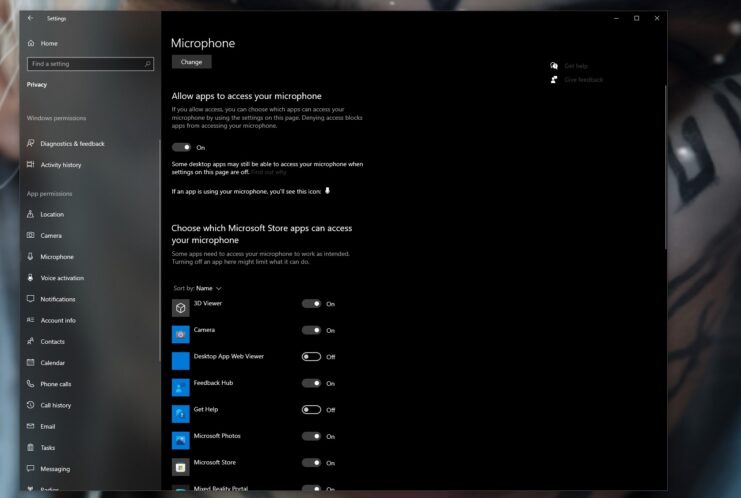
- Choose Privacy and then select Microphone from the left pane.
Allow Apps to Access Mic
Ensure the toggle for “Allow apps to access your microphone” is turned on. Below, you can manage which specific apps can access the mic.
7. Address Possible Interference
External interferences, especially with wireless devices like microphones or even AirPods, can result in audio dropouts. Just as with microphones, wireless earbuds can also face similar connectivity challenges due to interference.
Disruptions in gaming can be caused by issues like a PS4 controller disconnecting
Eliminate Physical Barriers
For wireless mics:
- Ensure there are minimal obstacles between the mic and its receiver.
- Move closer to the receiver if you’re at a considerable distance.
Switch Wireless Channels
If you notice interference from other devices:
- Try changing the wireless channel on your microphone or its receiver to reduce interference.
8. Use Windows Troubleshooter
Windows has a built-in troubleshooter designed to detect and automatically fix hardware and device issues.
Accessing the Troubleshooter
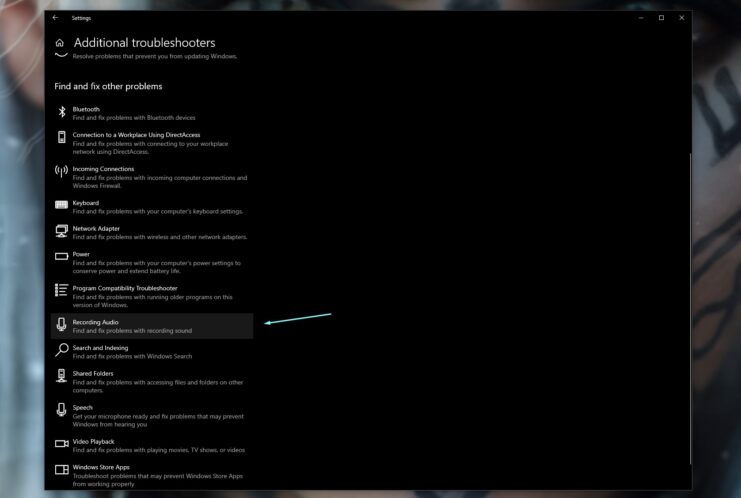
- Go to Settings, then Update & Security.
- Choose Troubleshoot from the left pane, and select Recording Audio, then Run the troubleshooter.
Follow On-Screen Instructions
The troubleshooter will identify any potential issues and offer solutions or adjustments to fix them.
9. Check for Windows Updates
Occasionally, the problem might be a known issue that gets resolved with a Windows update.
Check for Updates
- Navigate to Settings, then Update & Security.
- Click on Check for updates and install any available updates.
Restart After Updates
It’s always a good practice to restart your computer after installing updates to ensure they’re correctly integrated.
10. Consider External Factors
Sometimes, the issue may stem from factors outside your computer.
Inspect for Electromagnetic Interference
Devices like routers, cordless phones, or other wireless equipment can interfere with your mic.
- Move such devices away from your computer and microphone setup.
Environmental Noises
Loud environments can cause auto-adjusting microphones to cut out when trying to eliminate background noise.
- Try moving to a quieter location or use noise-canceling features if your microphone has them.
FAQs
Why is my microphone not detected after updating to Windows 11?
If it isn’t detected after updating to Windows 11, it might be because your apps do not have permission to use it. Ensure that you give your apps access to it by navigating to Start > Settings > Privacy & security > Microphone and turning on “Microphone access.”
How do I ensure that specific apps have access to my microphone?
Go to Start > Settings > Privacy & security > Microphone and ensure “Let apps access your microphone” is turned on. From there, you can choose which apps have access. Note that desktop apps won’t appear in this list.
What if I want to give access to desktop apps?
If you wish to give access to desktop apps, ensure that “Let desktop apps access your microphone” is turned on. It’s important to note that you can’t turn off microphone access for individual apps.
What should I do if others can’t hear me?
First, check if your headset has a Mute button and ensure it isn’t active. Make sure your microphone or headset is connected correctly to your computer. Also, ensure that your microphone or headset is set as the system default recording device.
How do I set my microphone or headset as the system default recording device in Windows 11?
Navigate to Start > Settings > System > Sound. Under “Input,” go to “Choose a device for speaking or recording,” and select the device you want.
How can I test if my microphone is working in Windows 11?
Go to Start > Settings > System > Sound. Under “Input,” speak into your microphone. In the “Volume” section, ensure the blue bar moves, indicating that Windows is detecting your voice.
What should I do if my mic volume is too low or not working at all?
Ensure that the mic or headset is connected correctly and positioned properly. You can also increase the volume of your mic in the settings.
How do I increase the volume of my microphone in Windows 11?
Navigate to Start > Settings > System > Sound. Under “Input,” select a microphone to see its properties. In “Input volume,” ensure the blue bar adjusts as you speak into the microphone.
How can I troubleshoot issues with my microphone in Windows 11?
If you’re experiencing issues, go to Start > Settings > System > Sound. Under “Input,” select “Test your microphone” and then “Start test.” This will help you identify and resolve any issues with your mic.
Are there any other resources for troubleshooting microphone issues in Windows?
Yes, Microsoft offers various support articles and resources for troubleshooting sound and microphone issues. You can visit the official Microsoft support page for more detailed guidance.
Final Words
Mic interruptions can be a pain, but with a systematic approach to troubleshooting, you can pinpoint and resolve the issue effectively. Whether it’s a hardware glitch, driver issue, or external interference, this guide has got you covered. Here’s to clear audio and uninterrupted conversations!